How to build a computer
How to build a computer. How to take a computer apart.
So far we have looked at how a computer system is put together, we’ve also looked at the different components that you will find inside a PC and you should by now have a better understanding of how they operate.
Our next step is to show you the insides of the computer, how a computer is taken apart and also how a computer is built.
Kit List
You will certainly learn a lot faster if you can follow along with us and take your own PC apart as we progress. If you don’t have this as an option then not too worry too much you can always read through our steps and come back again in the future when you have an old computer you can teardown.
Tools you will need for this exercise
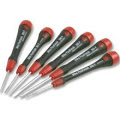
The tools you will need to take a computer apart vary but the most common tool you will ever use is the simple Philips style screwdriver from a precision set. Always buy a set that won’t easily break and have a magnetic tip. The only tool used in this exercise was a single Philips screwdriver.
We will begin by taking the computer apart to show you how to build a PC

The picture above shows our computer still in it’s case. As previously explained you can see that this case is a tower type of case.
Please note that the case part of the computer IS THE COMPUTER, not the monitor and the keyboard and mouse. Those things can be disregarded for now as they play no part in the PROCESS, they are simply INPUT and OUTPUT devices.


The first thing we do is to remove the computer case. This is usually easy as it just means removing a couple of screws from the rear of the case and sliding the side off the computer. However, it’s not always this easy as manufacturers seem to take delight in trying to make their cases as difficult to get into as possible sometimes. If you remember to take the screws out of the back and use a bit of common sense the side or the lid should slide off with no problems.
Remove the front of the computer
The picture below shows some plastic clips that hold the front panel onto the computer. Lift these clips up and remove the front panel so you end up with the pc looking as shown below.
This step is not necessary when taking a computer apart, we have included it to show how to do it should you need to.


What is inside a computer?
Hopefully you are following us along and have managed to get hold of a PC that can practice on. If you have got this far you should now be able to see the Motherboard and all of the computer computers inside include the cables and wiring.


As we are breaking this PC down rather than troubleshooting it the next step is to make some space inside the case and we can do this by starting to remove the peripherals (this is a fancy word to describe anything that is connected to the main computer, this could include a keyboard, mouse or printer but also includes other devices) and components such as the RAM and the Hard Disk Drive. So let’s take out the Hard Disk Drive (HDD)
Removing the Hard Drive from a computer
The Hard Drive is housed inside a part of the case that looks like a metal cage as shown in the picture below. Start by removing the cables that are plugged into the drive. This will comprise of a power cable and a data cable. In the example below you can see that we will be removing an IDE cable (this is the data cable) and a P4 cable (this is the power cable). For more information on these cables see our computer fundamentals tutorial.


We first of all remove the cables from the HDD. Depending on what Hard Drive you have inside your PC (IDE or SATA) you may have a flat ribbon cable (like we have here) or a SATA type cable. SATA is newer technology than the older IDE and runs faster, the cables and connectors that the cables plug into look different too!
This is a SATA cable

and this (below) is an IDE cable

Make sure that when you remove the cables you handle only the plastic connector and not the wires otherwise you will rip them out! Remove the cable from the motherboard end as well. Sometimes there is a little catch on a SATA cable to unplug it. There are not catches on an IDE cable.
Remove the optical drive (CD / DVD drive)
On the side of the metal cage you can see that the hard drive and also the optical drive are held in place by screws. Undo those screws and then the cables from the back of the optical (this could be a CD or DVD drive). The cables in the back of the optical drive will be the same as the hard drive cables (i.e a flat ribbon type cable (IDE) or a SATA as shown above) there will also be a power cable for each of these. Remove all of these cables and from behind push the optical drive forward and remove it from the front as shown.


The pictures below show the interface on the optical drive. In this instance this shows an IDE type interface.


Again, remove the cable from the Motherboard too.
Removing memory (RAM) from the computer
The memory sticks (RAM) are retained by clips at the end of each memory stick. Remove it as shown by pushing the clips down. Do not touch the metal part of the RAM this is very sensitive and could be damaged by static electricity stored up in your body. Ideally you should wear an anti-static wrist band.
REMEMBER IF ANY OF THESE PHRASES SUCH AS RAM, HDD ETC SEEM UNFAMILIAR TO YOU AND YOU WOULD LIKE THEM EXPLAIN YOU CAN ALWAYS VISIT OUR SECTION ON COMPUTER FUNDAMENTALS WHERE YOU CAN LEARN HOW A COMPUTER WORKS OR VISIT OUR COMPUTER COMPONENTS SECTION TO LEARN WHAT ALL OF THE BITS AND PIECES DO.


Remove all power cables attached to the motherboard
If you follow the colored cables from the power supply unit (PSU) you will see that they are attached to the motherboard of the PC. As shown in the pictures below remove them, taking care not pull at the cables themselves and only the plastic connectors. For further details on these cables see our section on PC Components.


Remove the fan that sits on top of the CPU
The fan that you can see on the Motherboard normally sits on top of the CPU. There will also be a HEATSINK. The heatsink will have metallic fins and acts like a car radiator drawing heat away from the CPU underneath. The fan then draws this heat away.
The fan will have a power cable attached to it. Remove it carefully. The fan will most likely be held in place with screws. The HEATSINK will most likely be held down by clips (but not always).

Once the fan and heatsink are removed you can then remove the CPU. You will most likely encounter a Zero Insertion Force (ZIF) metallic arm that is held under a clip which retains the CPU itself. Take care when undoing this.
TAKE CARE NOT TO TOUCH THE UNDERNEATH OF THE CPU IF YOU REMOVE IT. This step is unnecessary if are taking a computer apart and we have included it so you can see it being done. When the CPU is removed there is usually a small golden triangle on the chip and a corresponding triangle on the CPU housing or as is shown in the picture a couple of notches, this is to ensure that the CPU is put back correctly. Take a note of this if you remove the CPU.


Remove front panel cables
The buttons and LED’s on the front panel of the computer are attached to the motherboard. You can see these on the picture below and also see the colored connectors on the motherboard where they attached to. PLEASE NOTE: take a note of which wires / cables go where as they vary from manufacturer to manufacturer.


Undo the screws that retain the motherboard


Remove the Computer Motherboard


Remove the Power Supply
remove screws from the back of the power supply


Ok and we’re done!
Summary
So what can learn about how a computer is put together from that little exercise?
1) A computer is made up of a CASE and other peripherals. The part that makes a computer do anything (i.e process) is the part that is contained within the CASE. The monitor, keyboard and mouse are PERIPHERALS and are INPUT and OUTPUT devices.
2) You remove a computer case USUALLy by removing 1 or 2 screws from the rear of the case. If only this was the only way to do it, unfortunately we see in our workshop lots of variations such as a sliding lid, a removal handle on the side of the case and more. Use a bit of common sense to figure out how to get inside the computer case, we promise you that you WILL be challenged from time to time.
3) Inside a computer you will find many wires, cables and pieces of electronics. The main Printer Circuit Board (PCB) in any computer is called the MOTHERBOARD (occasionally called the Main Board).
4) You will also find a Hard Drive, possibly an Optical Drive (CD/DVD), sticks of memory (RAM).
5) You can remove all of these parts as shown above, including the cables and wires that are connected to them.
6) Finally you can remove the computer Power Supply Unit (PSU).
What we haven’t shown you here is how to customize a computer, how to build a gaming computer, how to upgrade a computer or how to troubleshoot a computer. The reason for this is simple, let’s teach you to walk before you run. The exercise above is simply to show you the basics of how a computer is taken apart and to build a computer is simply the reverse. Of course the clever bit is knowing how to specify the correct parts so you can build a computer in the first place, but this is something that we will cover in due course.
But for now, let’s look at how to troubleshoot those parts that have just been described.
Ok, now let’s look at something called ‘form factors’, click here to continue…