How to Disassemble a Laptop – Take Apart ANY Laptop Using These 8 Steps

Learning to take apart a laptop
Let’s begin this section of laptop disassembly in 8 steps by also explaining that the purpose of the ‘laptop teardown’ is to give you the confidence that you can disassemble any laptop and how laptop assembly works. You can use these steps to take apart a laptop regardless of make or model, as you gain more experience you may adjust them slightly but this is a tried and tested approach.
An introduction to laptop disassembly
Really the only time you would need to undertake full a complete laptop disassembly is perhaps if you are to replace a motherboard or laptop case. The majority of repairs or replacement will only require a few of these steps to be undertaken.
However, manufacturers DO tend to follow a common pattern and a system when building laptops regardless of the brand and because of this we can follow as a guide these 8 steps that can be applied to ANY laptop as a guide. They show you how to disassemble or how to open a laptop regardless of manufacturer.
The 8 steps of generic laptop disassembly & how to open a laptop
- 1. Remove the power supply and battery
- 2. Remove the accessible components
- 3. Remove the Hinge Plate Cover (HPC) / Keyboard Bezel and keyboard
- 4. Remove any other cables under the keyboard that you see
- 5.Remove the display unit
- 6. Continue to remove any other screws from the case
- 7. Pry case apart
- 8. Remove the motherboard and motherboard peripherals
The aim of this exercise is to give you an overview of how to generically disassemble a laptop. The aim is to introduce the student to the various components found within a typical laptop and how you can replace them.
- Remove the power supply and battery
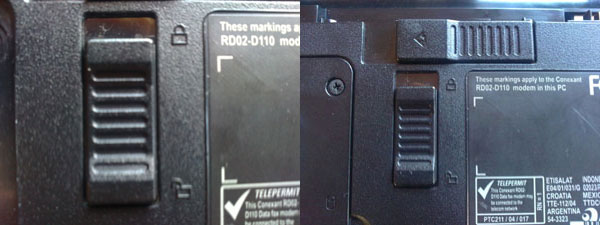
Removing the battery and power adapter
- Move the locking slider to the ‘unlock’ position
- Move the other slider in the direction of the arrow
- Pull the battery out straight and not on an angle
- Remove the accessible components
Remove accessible components.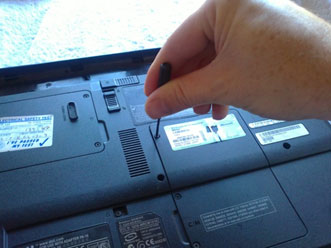
How to unscrew a laptop
- Use an appropriate magnet tipped screwdriver, most of the time you will use a Philips screwdriver for this (see laptop disassembly tools)
- If you are removing a cover, e.g. a Hard Drive or RAM cover, it may help if you place masking tape over the screw hole to keep the screws in place once the cover is removed so as not to lose the screws.
- If the screw spins and does not come out first of all turn the laptop over and gently tap the underside, try using the magnetic tip of the screwdriver to pull the screw out if this helps
- If the threads on the screw have became worn then consider using a Dremel tool to drill the screw out.
How to take the back / bottom of a laptop off
- Undo the screws from all of the covers that house the components found on the underside of the laptop.
- The number of covers will vary from laptop to laptop. For neatness and efficiency put the screws back into their holes on the covers once removed from the laptop and consider putting some masking tape over the hole.
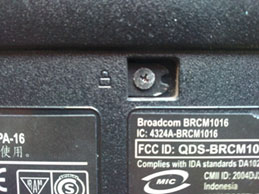
- There is also a single screw that retains the CD/DVD drive. On most laptops this appears as a small CD picture, in this case it is the picture of a padlock. Sometimes this screw is located underneath a cover. Try to imagine the size and length of a CD/DVD drive to get an idea where the screw will be located. Remove this also.
Remove the covers and lay them out upon a cleared area of your workbench in such a way that they are positioned in rough relation to each other as they were upon the laptop.
HARD DRIVE: – Remove this by pulling it in the opposite direction to its data pins. There may be screws or maybe not. The drive should pull out easily. Place it on top of its cover in the cleared area of your desk.
RAM: – There are clips either side of the sticks of RAM that push outward. It is advisable to use a plastic spudger tool whenever possible to prevent any static discharge from occurring. When release the RAM will pop up at an angle of 30 degrees. Remove both sticks of RAM and place them on top of their cover in the cleared area of your desk.
There may be more covers that you can remove or not. If you can see more then keep going until all covers and components have been removed.
WIRELESS CARD: – There is a small gold tipped cover which you can prise off with minimum effort. This is the wireless antennae. The wireless card itself can be removed in the same manner as the sticks of RAM. Remember to remove it at 30 degree angle.
For now if you see a heat sink under a cover then leave it in place. If you remove it you could damage the CPU.
- Remove the Hinge Plate Cover (HPC) / Keyboard Bezel and keyboard
Remove the ‘Hinge Cover Plate’ and keyboard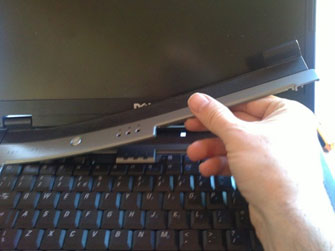
With some laptops there are additional screws that retain the Hinge Cover Plate, (HCP) most of the time they will be indicated by a small picture of a keyboard (but not always). These screws will sometimes located inside the removed battery area. Remove them and take a note of their position and type so you can differentiate them from other screws later on.
Sometimes there is an obvious notch where you can begin to remove the hinge plate cover. Using a small flat head screwdriver prise this up. Minimum force is always required and no more. When you do this with other laptops if you have to use more than minimum force then there are likely to be retaining screws. STOP and remove them before you do any damage.
Once the hinge cover plate has been prised up, use your fingers to gently remove the whole part. Place it with the other covers on your work desk.
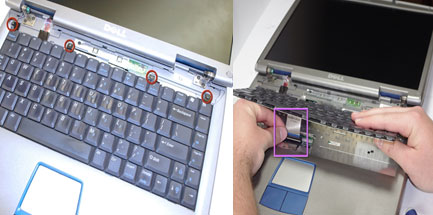
Remove the retaining screws found underneath the hinge cover plate. Check for any additional screws near the bottom of the keyboard too.
The keyboard will not simply lift up you need to push it forward toward the screen first.
THERE IS A RIBBON CABLE UNDERNEATH THE KEYBOARD – BE VERY CAREFUL NOT TO PULL IT OUT AT THIS POINT.
The ribbon cable is held in place by a plastic hinge which you can lift up using either your finger nail or a plastic spudger tool.
- Remove any other cables under the keyboard that you see
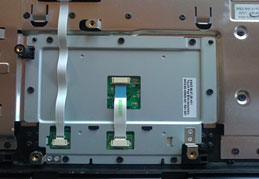
It may be a good idea to take a picture or draw a diagram of where all the cables go.
The ribbon cable connectors only come in a few varieties and they either prise forward or upward. You might also see small plastic plugs for some cables. They just pull out.
- Remove the display unit
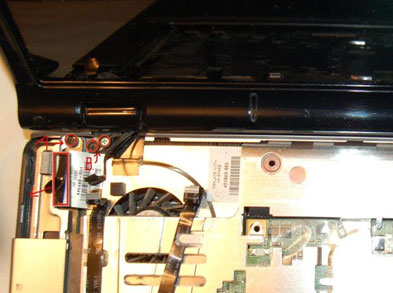
Our next step will be to remove the display unit. As with most laptops before this can be done we also need to remove the antennae cable and the LCD data cable. These cables can be connected in variety of manner but removal is usually straight forward.
Take out the hinge screws for the display assembly. Sometimes they are on the back and others they are inside. Try to see where the hinges might be connected, they usually use longer screws.
Take out the hinge screws for the display assembly and gently removed the part.
SCREEN REPLACEMENT / FL INVERTER
Remove the black rubber pads from around the edge of the screen surround. The retaining screws are to be found under here. When removing the pads using as little force as possible as to not damage them. Try and use your finger nails at first before resorting to other tools.
Undo the screws and place them into a tub on your separate work area.
Using a spudger tool or your fingers pry the front cover away from the back part of the screen. Run the spudger tool around the outside if required but at no point should you feel resistance, you may have missed a screw if you do.
With the front cover removed the LCD screen is now exposed.
Remove the tiny screws from the side of the LCD screen and remove the screen taking care not to touch the back part of the screen that says ‘DO NOT TOUCH’.
Most laptops allow you to just remove 2 screws from the top front part of the metallic arms that hold the LCD in place which allows you to tilt the screen and have access to the FL INVERTER.
otherscrews
- Continue to remove any other screws from the case

Remove them all and place them either in pile so you can identify them later or into a small container. Make sure you label them so you know where they came from later on.
Repeat this procedure for the other half of the laptop.
- Pry case apart
Pry case apart – use spudger, fingernails or plastic tools. Again, if you feel resistance STOP and double check you have removed all of the screws.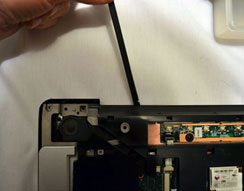
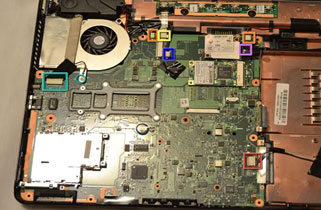
- Remove the motherboard and motherboard peripherals
Removing the Motherboard.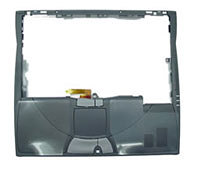
Take note that the touchpad comes as part of an assembly and when you buy a replacement one of these it comes as the assembly and not just the touchpad.
Remove all screws securing the system board, the power board, the video board, etc. Disconnect all cables, connecting the boards.
Sometimes the screws on the motherboard have a letter assigned or white arrows. They are the ones you have to unscrew to get the motherboard off because you don’t always have to take all the screws out.
Take the screw numbers as a guide for fitting and removal.
Slowly take the motherboard out and feel for where the pressure seems to keep the board in place. It should come out with no pressure.
PUTTING IT ALL BACK TOGETHER
The process is simply the reverse.
STEP 1
Put the motherboard back into the case and reconnect the sound cable.
Put all screws back into the white arrow holes.
Put the case parts back together. Remember to thread the cables including the antennae cable back through. Make sure no cable is snagged or caught up anywhere.
STEP 2
Put the retaining screws back into the bottom half of the laptop. Then put the top screws back in.
STEP 3
Put the screen back in place and reconnect the antennae and the data cable.
Replace the display hinge screws.
STEP 4
Replace the keyboard. First of all put the ribbon cable back in. Remember there is a plastic hinge which holds the ribbon in place, remember to lift this up first (gently).
The ribbon has a darker side and a lighter side. It is the lighter side that faces upward, so there is no twist in the ribbon.
Replace the keyboard retaining screws.
STEP 5
Click the Hinge Cover Plate (HCP) back into place. Use even pressure to ensure it fits properly.
STEP 6
Replace the RAM. Remember it is fed into the slots at 30 degree angles and not straight on.
Once it has been fed at a 30 degree angle, click it downwards into place.
Replace the other components such as the wireless card, again remember it has to inserted at a 30 degree angle. Click it into place and gently replace the gold connector.
Replace the Hard Disk Drive (HDD) by sliding it in the opposite direction to the arrow. Make sure it fits securely and is not loose.
Insert the CD/DVD drive and put the retaining screw back into the underside of the laptop.
STEP 7
Finally, replace the component covers and replace all of the screws.
These steps give you a generic overview that you can use to take any laptop apart.
Now that we have an idea of about laptop disassembly let’s look at some things that go wrong
<